
Instructor Onboarding Guide
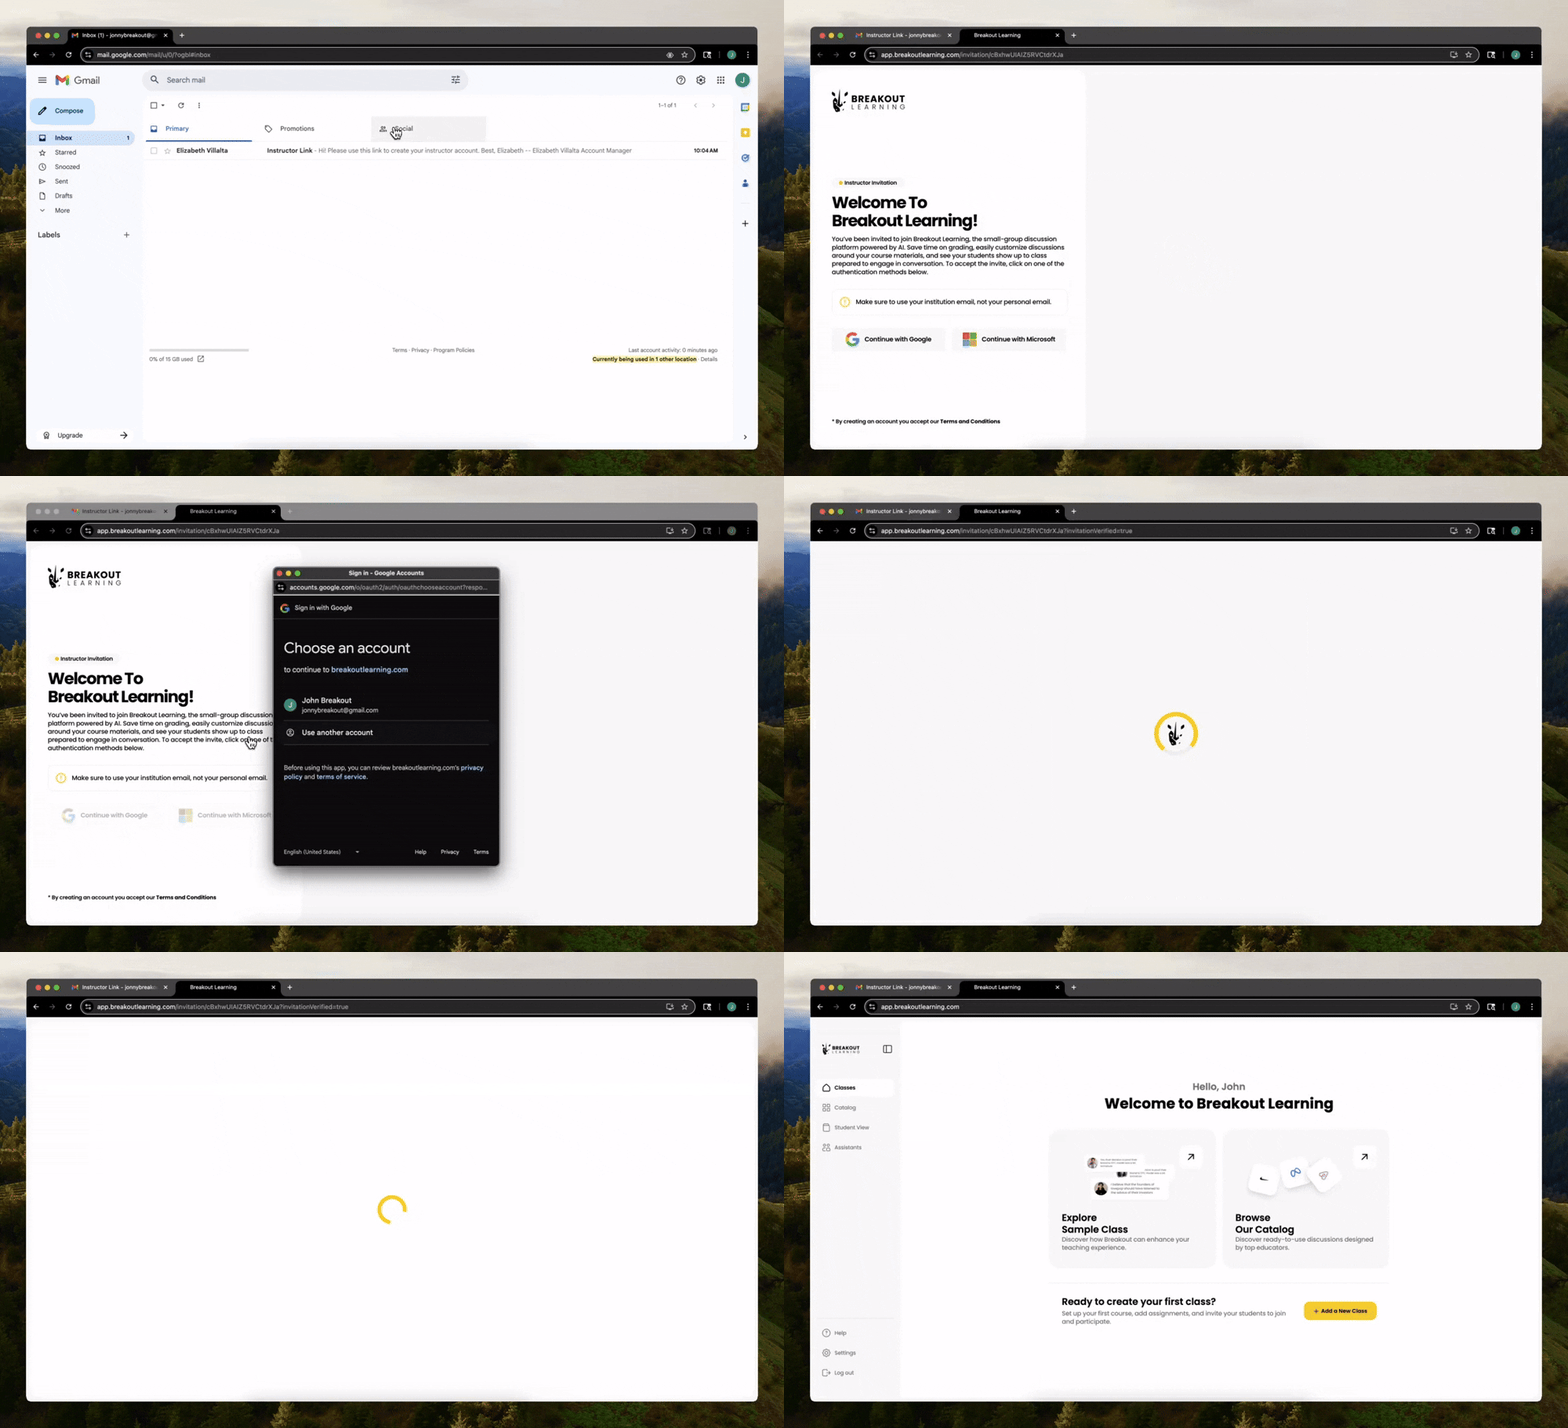
Log In
- Paste your Instructor invitation link sent via email into your browser to begin.
- For subsequent logins go to app.breakoutlearning.com (use Chrome, Safari, or Edge on a laptop/desktop) and sign in with your institutional email through Google (Gmail) or Microsoft (Outlook).
Click through a brief welcome slide deck.
Create a Class
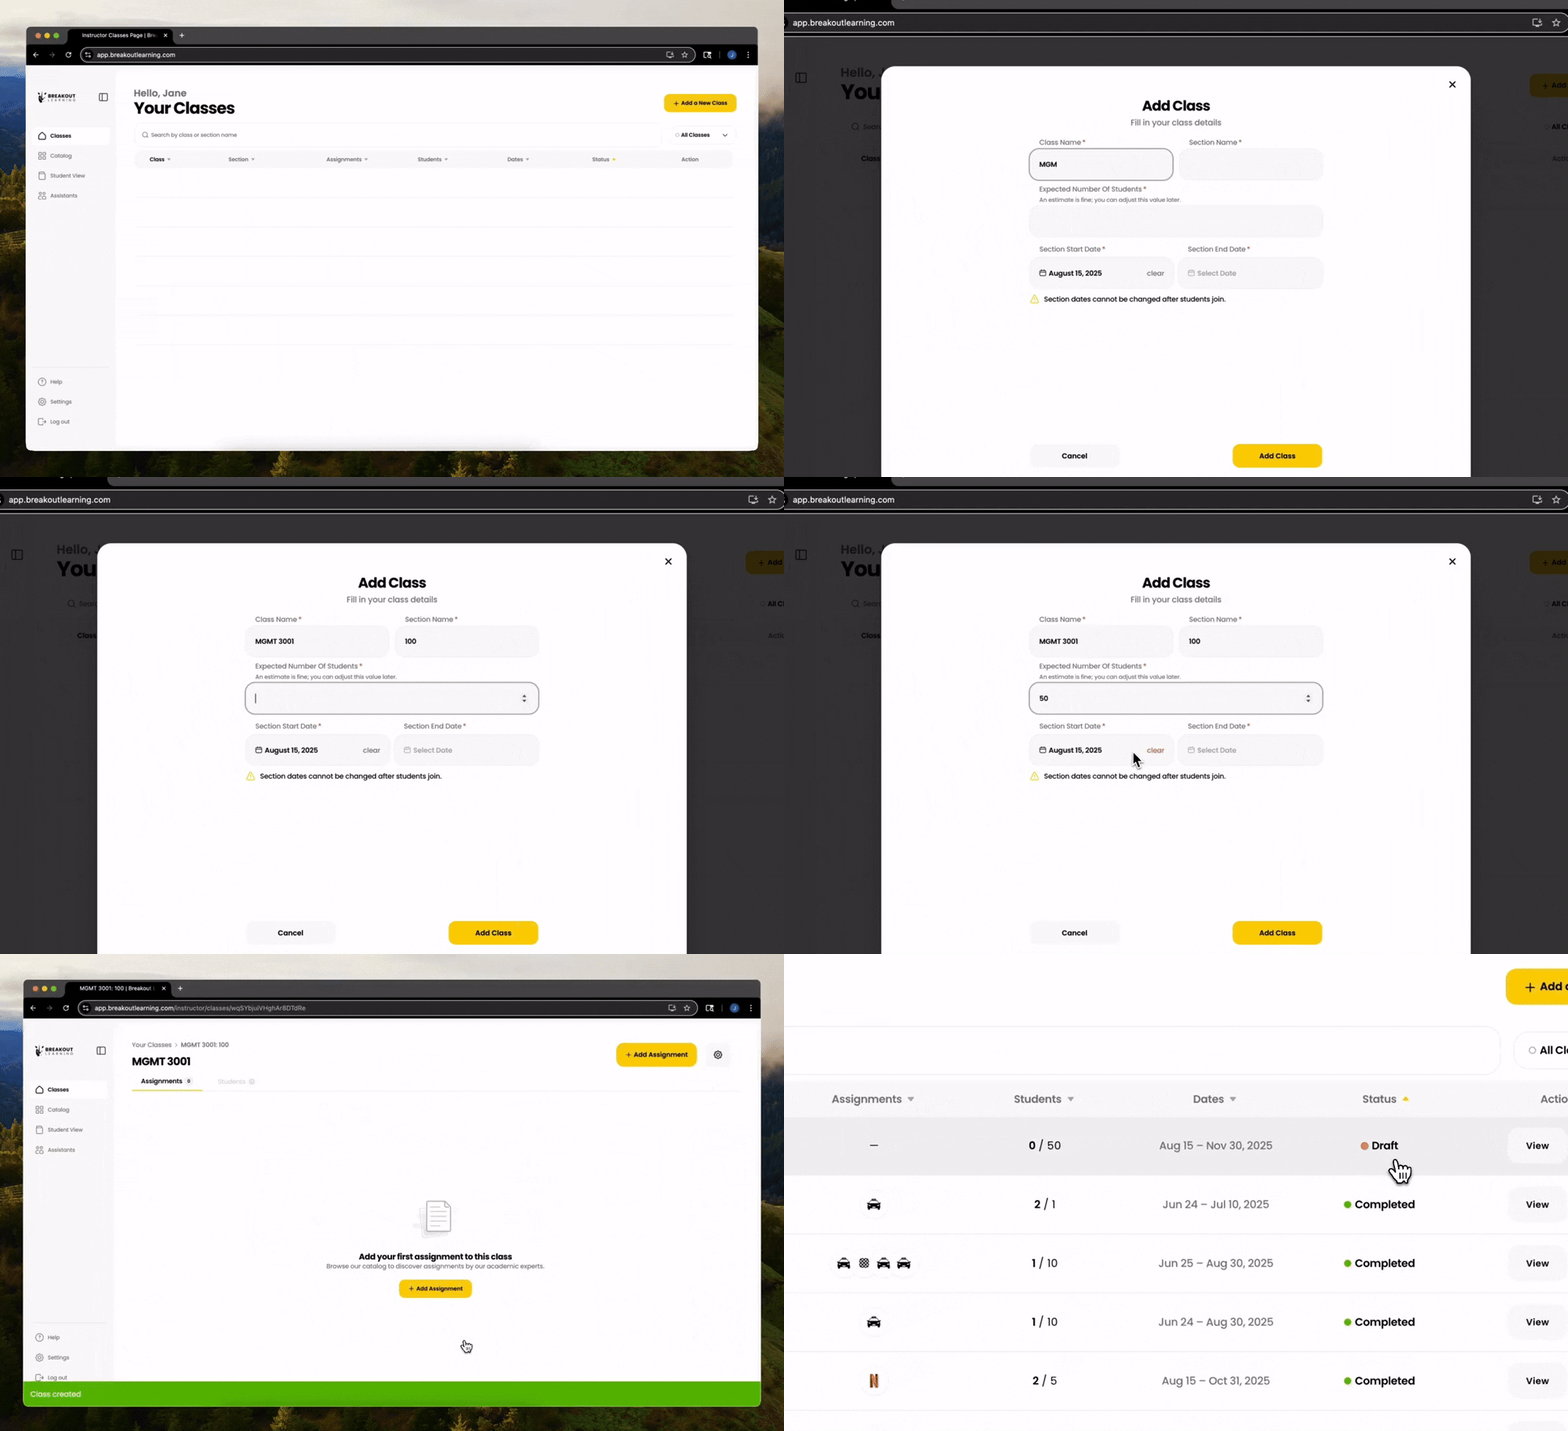
- Go to Classes → click Add a New Class.
- Enter your class name, section name, expected number of participants, and the start/end dates. We recommend using the actual course/section names so that students can easily identify it.
- Select your pricing depending on the number of modules you will be using.
- You'll now see the class on your Home page.
- Repeat the process to add additional classes/sections, if needed.
Assign an Assignment to a Class
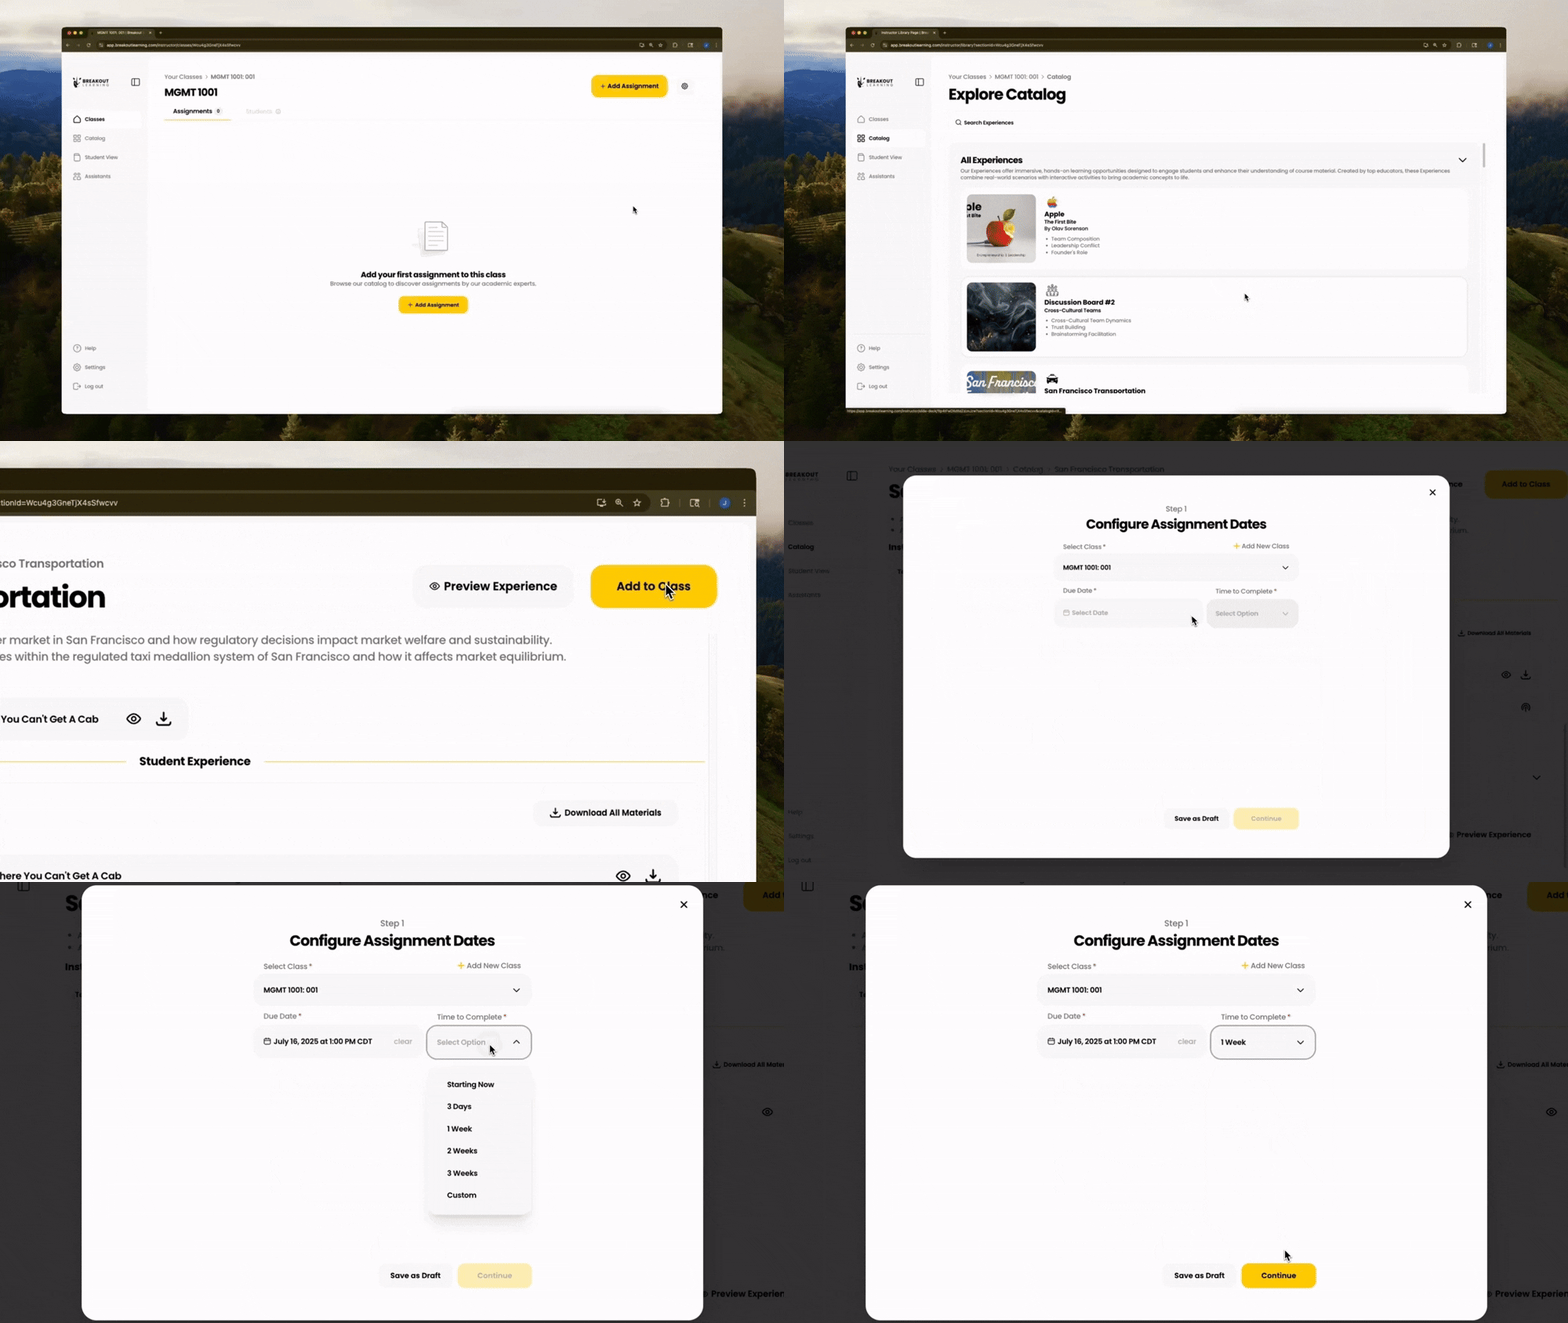
- From Classes, click into your desired class.
- Click "Add Assignment" on the center of your screen to add and preview Breakout experiences.
- Browse our originals catalog and our community generated catalog as well as any custom catalogs you may have. Click into any experience that looks interesting and preview the discussion.
- When you find one you like, click "Add to Class" in the upper right.
- Set your Available From and Due Date. You can also allow late submission in this step.
- If you are unsure of any dates or settings, you can click "Save as Draft" and edit these at a later time from your class page.
Student Grouping
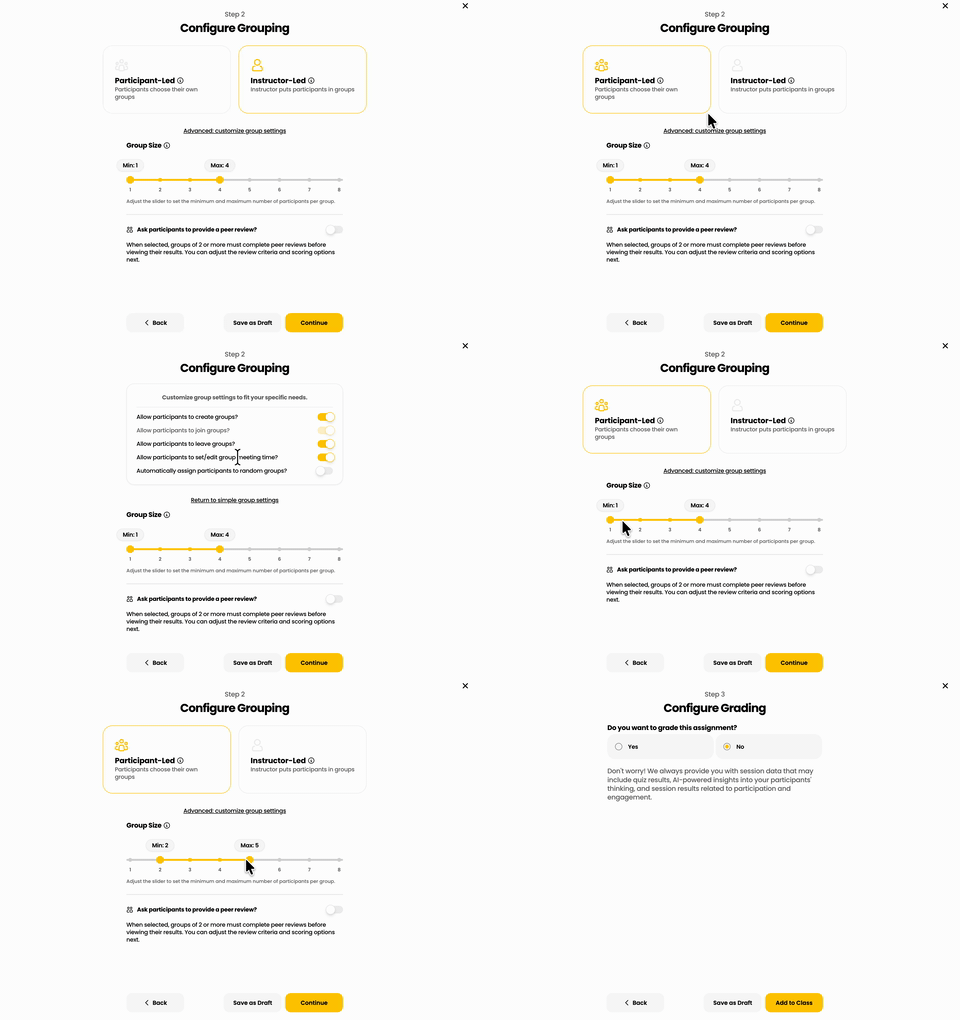
- Participant-Led grouping: Students are responsible for creating and joining groups on the platform.
- Instructor-Led grouping: Instructors are responsible for assigning students to groups.
- Set a Minimum and Maximum Group Size by adjusting the slider bar.
OPTIONAL: Add Peer Reviews to an Experience
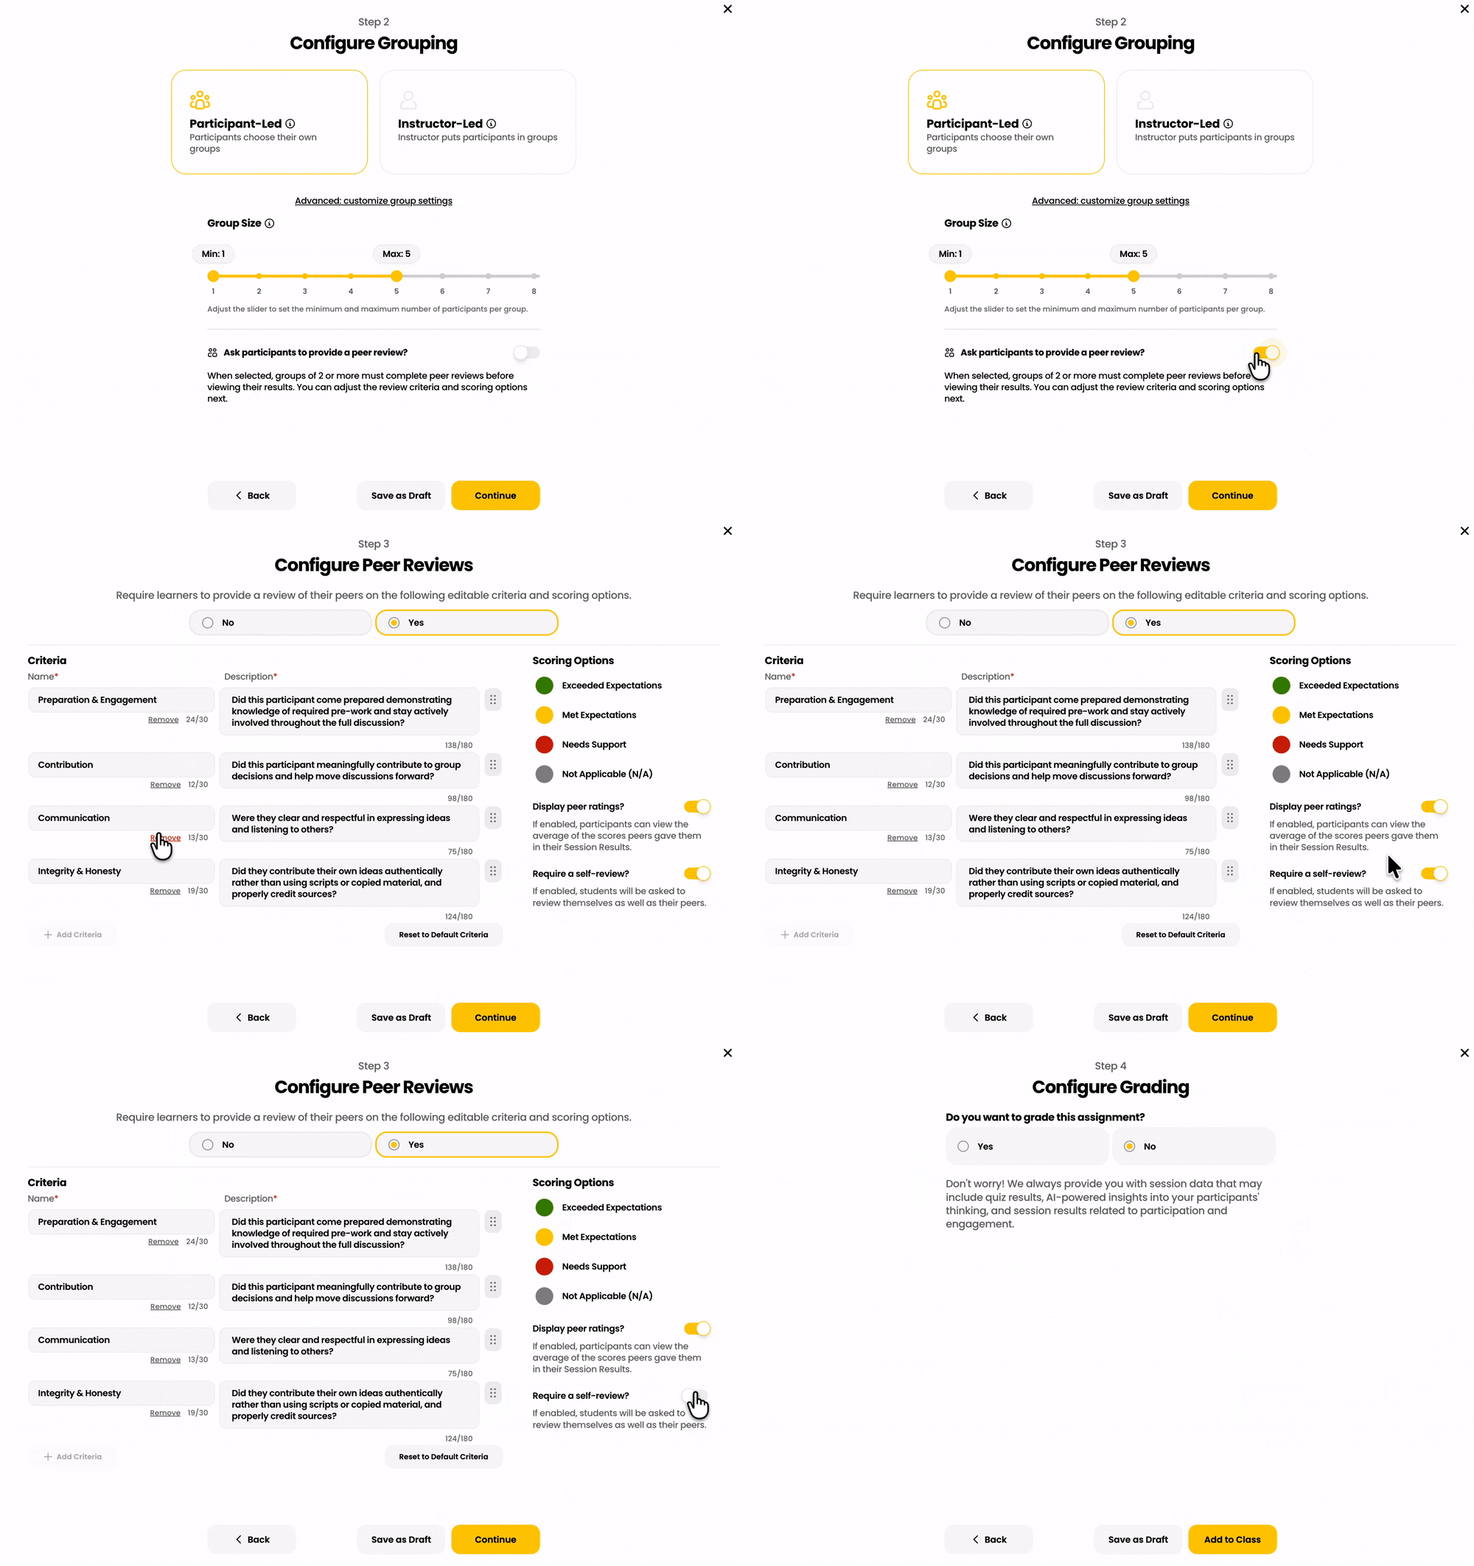
If you want to toggle on Peer Review, you can do it under Configure Grouping.
- The default criteria, Preparation and Engagement, Contribution, Communication, and Integrity & Honesty, will appear. Students will use the "scoring options" to anonymously rate their peers based on these fields.
- Click on any of the text boxes to edit the criteria or click remove on any extra criteria.
- Toggle on Display Peer Ratings if you want students to have access to their peers' anonymized reviews. If this is turned off, only instructors have access to peer reviews.
- Toggle on Require a Self Review? if you'd like students to review themselves.
- Click Continue when you are ready to proceed with these settings.
Configure Grading
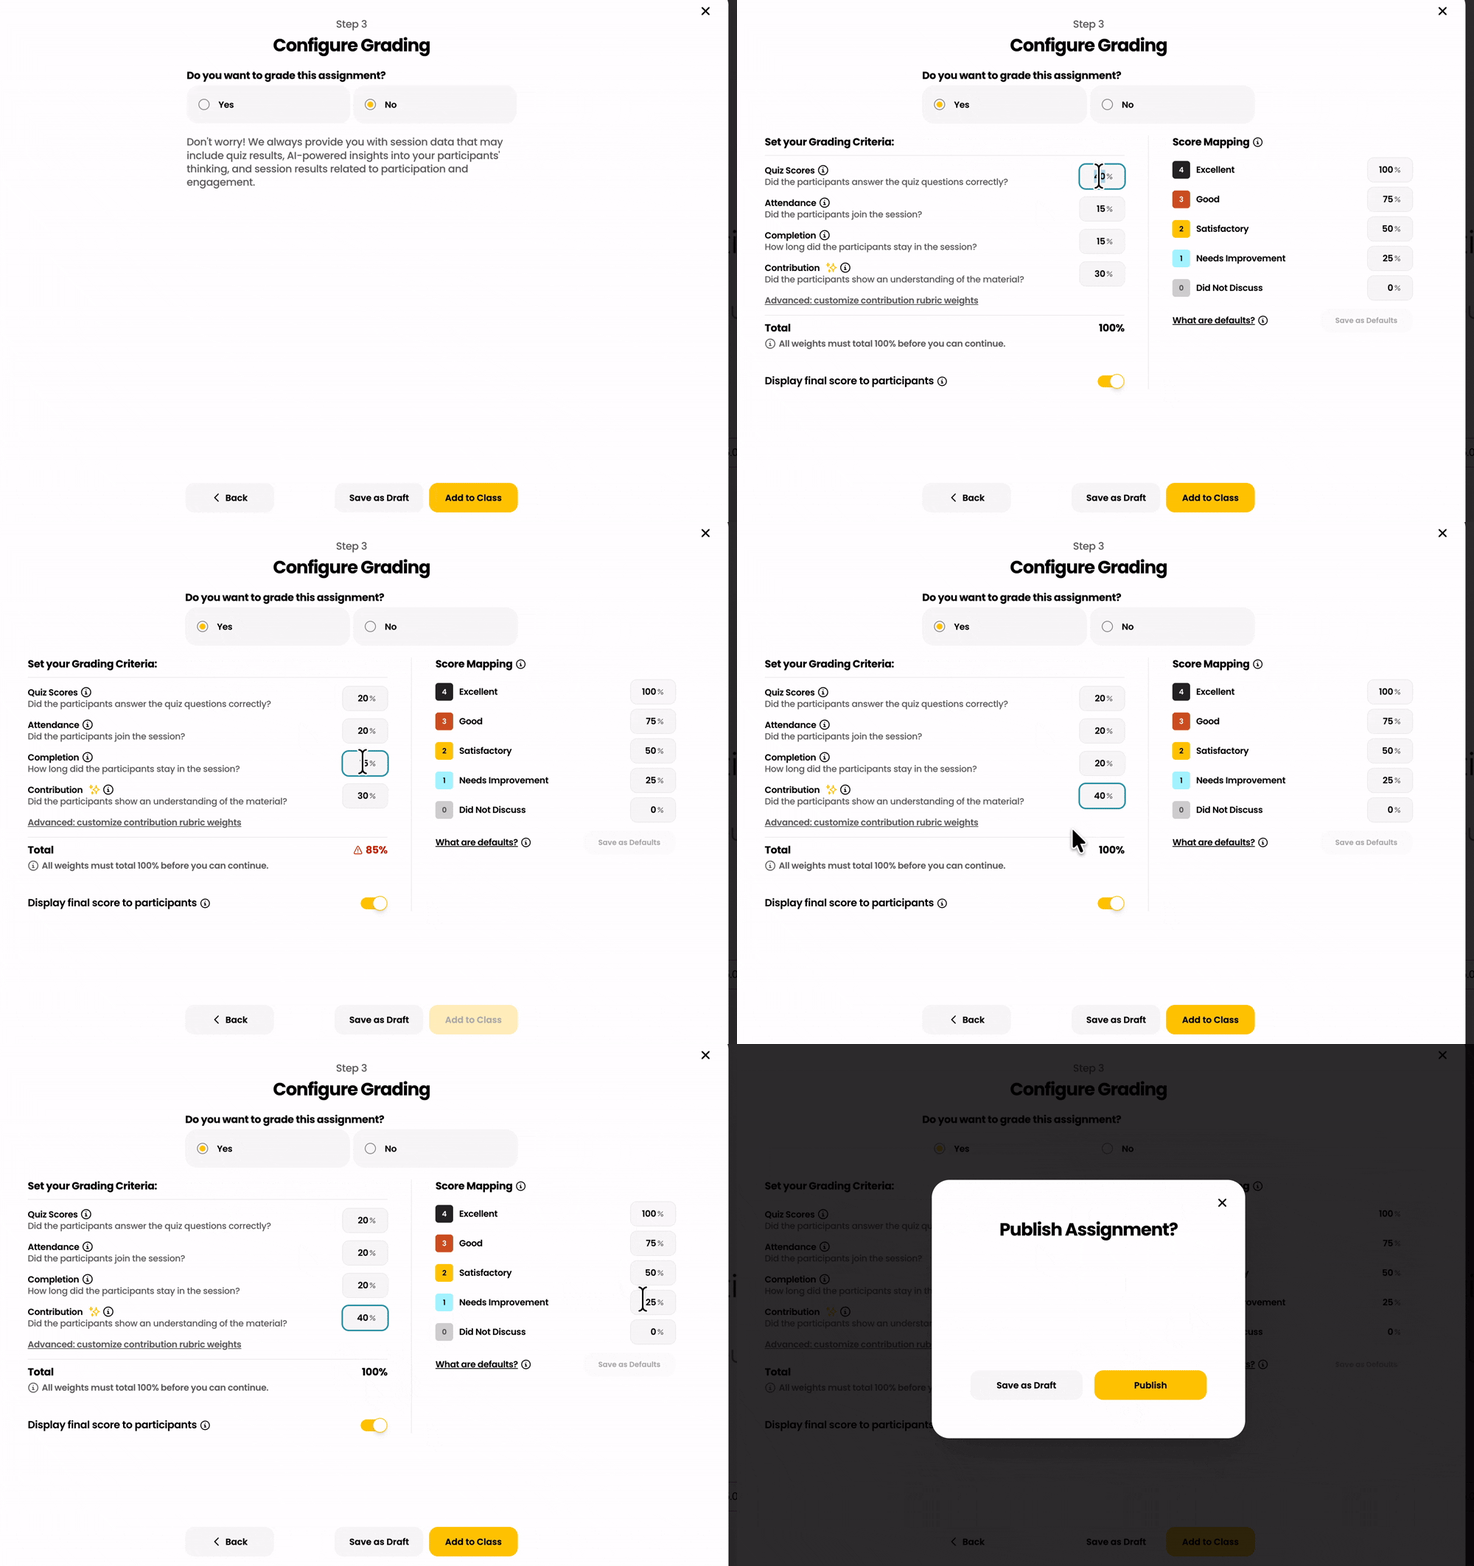
To configure grading click "Yes" under Step 3.
You will see weighting options for the following criteria:
- Quizzes (no AI): Student's individual score on the pre-work quiz.
- Attendance (no AI): Measures if your students showed up to the session (yes or no).
- Completion (no AI): Measures if your students remained in the session till the end (minimum score for any attendees is 50%. Non-attendees will receive a 0%).
- Contribution (AI-powered): Reflects how participants performed across the selected rubric criteria, based on the evaluation method defined for each rubric.
Breakout provides instructors with additional control over AI-generated grading by allowing them to customize:
- The weight assigned to each AI contribution rubric.
- How rubric scores are converted into percentage values used for grading.
- If you are unsure of these settings, you can click "Save as Draft" and edit these at a later time from your class page. Grading configurations can still be edited even after the session has started.
Schedule Discussions
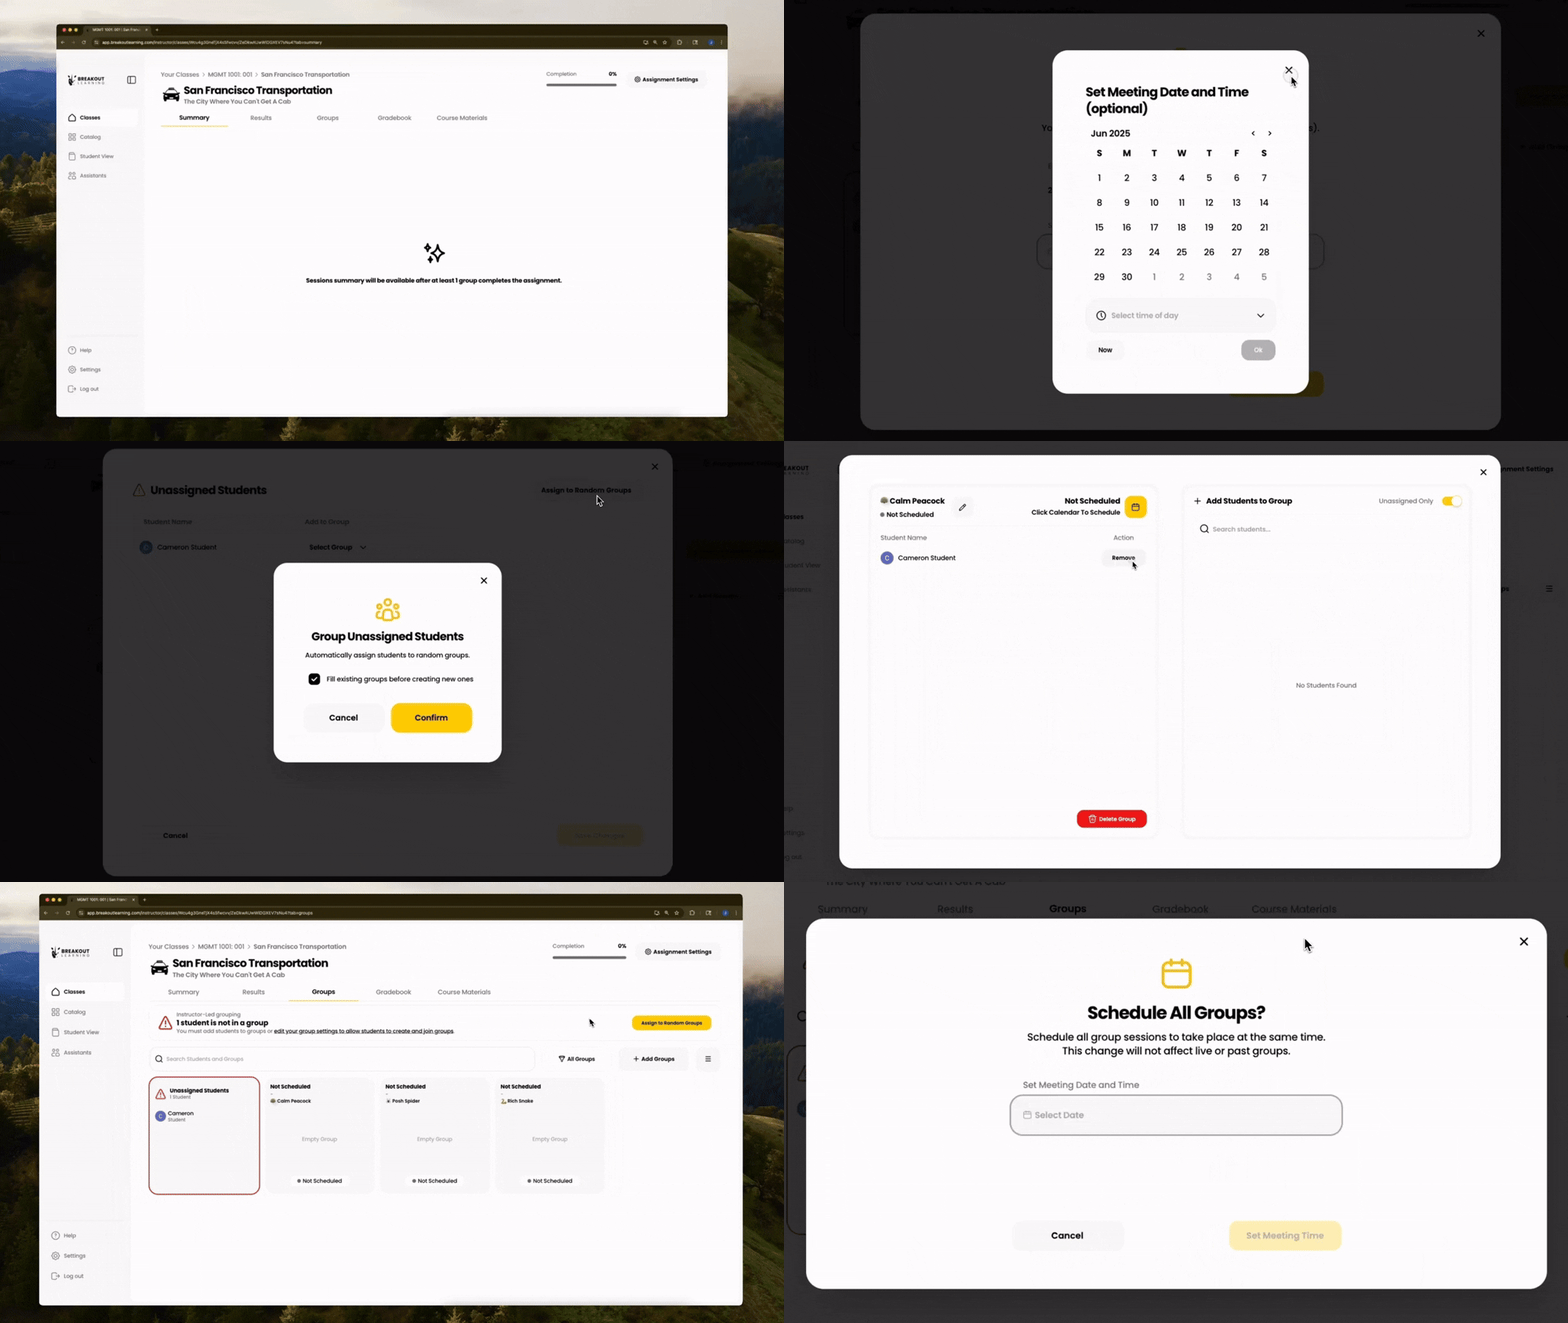
- Click into your Assignment and select Groups. You will see all of the groups that have been added to the module.
- To schedule all group discussions to your designated class time, select the far-right menu and click Schedule All Groups to configure the desired date and time.
- You can add and schedule new groups by selecting Add Groups.
- To add or remove students from a group, click Manage Group on the group you wish to edit.
Invite Your Students
- Return to your Class page by clicking the course name on the upper left-hand corner.
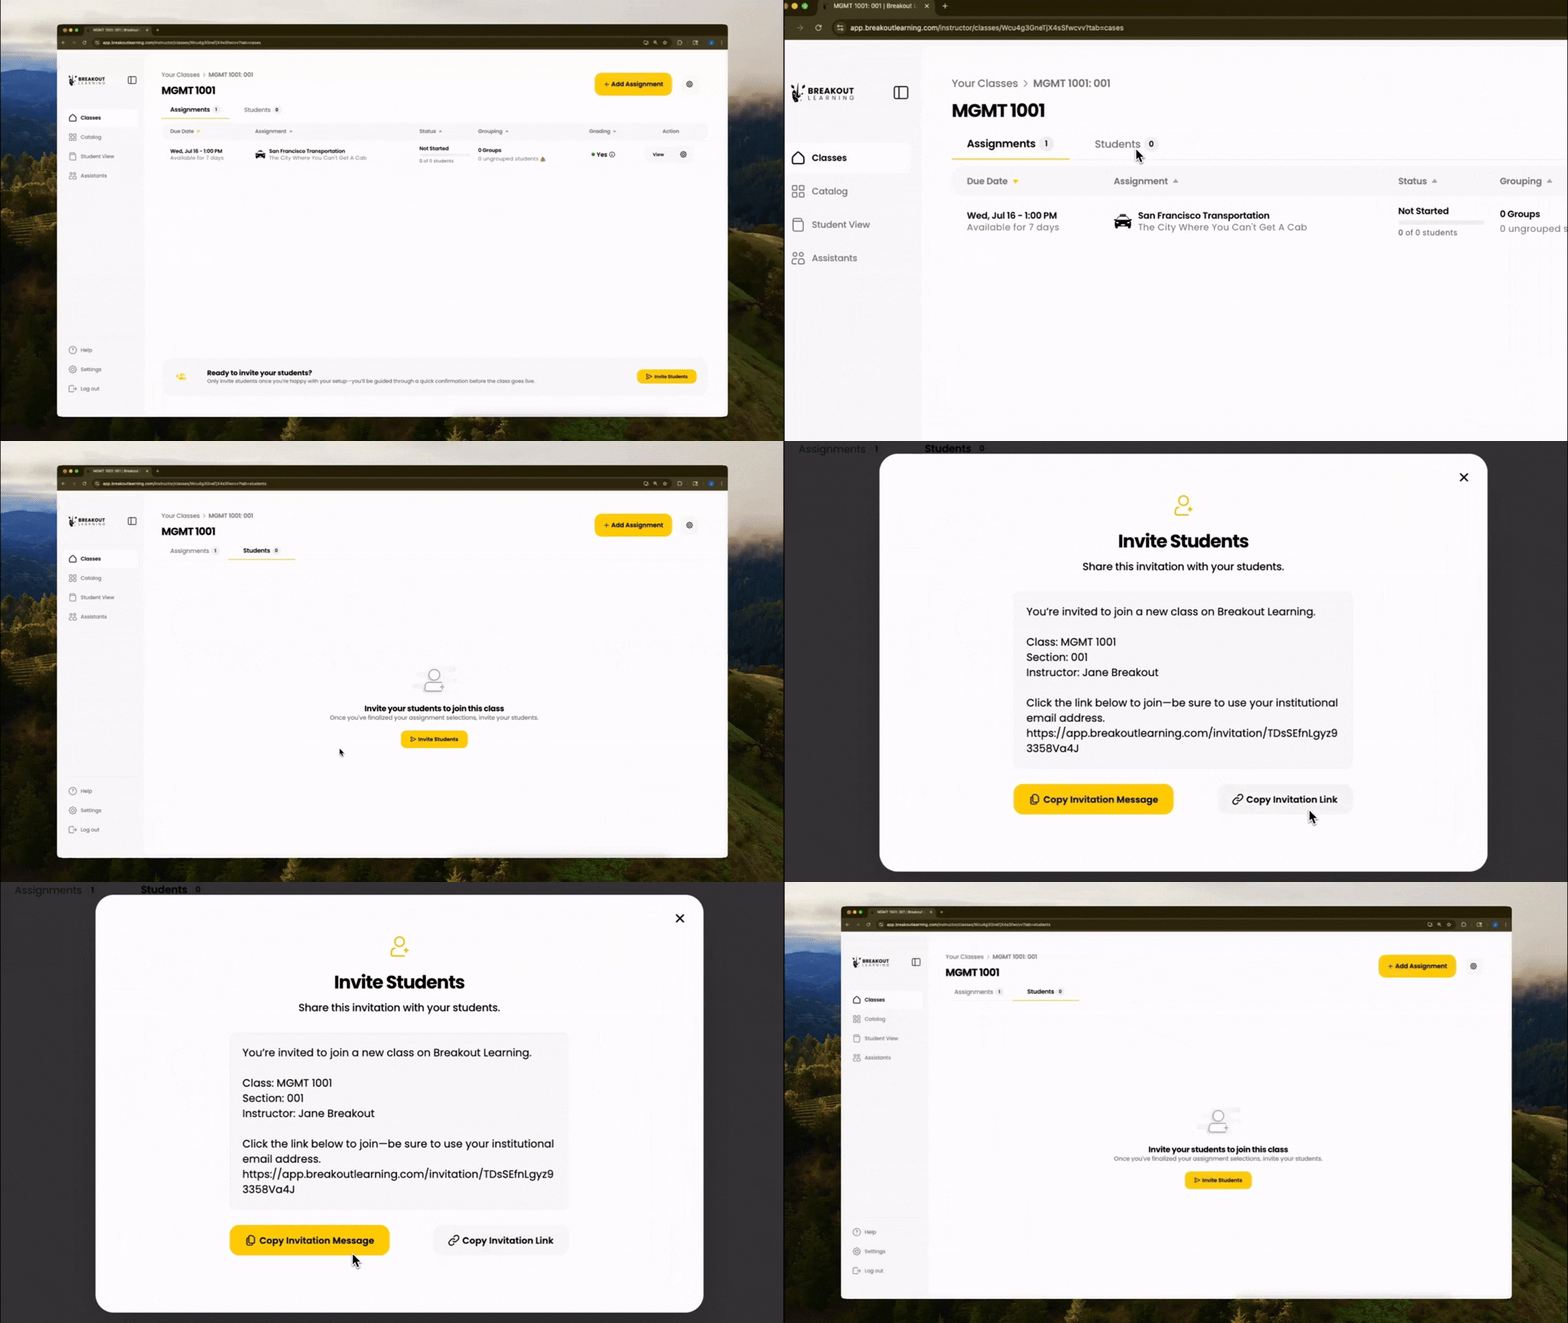
- Click the "gear" icon in the upper right, and click "Invite Participants."
- Click "Copy Invitation Message" to copy the invitation and an invite prompt for students. You can also click "Copy Invitation Link" if you'd rather create your own prompt.
You can post this link as an announcement on your LMS and/or share it with students directly, along with the Student Onboarding Guide.
Prepare Students for Breakout
- Let students know if they are responsible for scheduling their Breakout session(s) with their fellow group members.
- Have students follow your invitation link and click into an assignment in order to access Pre-Work materials.
- Inform students they need to complete the Pre-Work & pre-session quiz (if applicable) BEFORE their group's scheduled Breakout session.
- These directions are laid out in more detail in the Student Onboarding Guide.
- Have students ensure that their browsers (Chrome, Safari, or Edge) are up to date, and audio/video permissions are granted in their browser settings.
- Inform students that Breakout Learning is not compatible with smartphones or tablets. They must use desktop computers or laptops.
Further Questions?
Check out our Knowledge Base where we address many commonly asked questions.
If you have any trouble getting started, you can reach out to support@breakoutlearning.com.
We're looking forward to working with you!